
Setup Lumen Global LTI Integration
To enable faculty to use Lumen Learning courses from within your LMS, you will need to set up a global learning tool interoperability (LTI) connection.
There are three steps in this short guide to getting Lumen LTI integration set up:
- Add Lumen as an LTI provider (repeat for 3 domains)
- Import a test cartridge into a testing course
- Test the content to ensure the LTI connection was set up correctly
During this process you will need:
- The consumer key and secret provided to you by Lumen Support
- To download the cartridge that will be used to test the LTI set up in your LMS. You can download this cartridge here.
Register Lumen LTI Tool Providers
In order to fully set up the Lumen integration so that faculty members can import any Lumen course into the LMS, you will need to add the following three Lumen providers (using the same settings and steps as described in the Add an LTI Tool Provider section that follows below):
- Lumen Platform
- Provider Domain: courses.lumenlearning.com
- Lumen Waymaker
- Provider Domain: goldilocks.lumenlearning.com
- Lumen OHM
- Provider Domain: ohm.lumenlearning.com
If your faculty plans to only use OHM STEM courses you may choose to only add the last domain as a provider.
Likewise if using only Candela or Waymaker you may choose to add only the first two (both are required) and not to add OHM, however, we strongly recommend importing all three at once so that faculty have the flexibility to add any Lumen course at any time with no further LTI set up required.
Add an LTI Tool Provider
You can set up Lumen LTI integration by adding external tools (to be repeated for each provider domain as given above):
- In Moodle click on Site administration in your navigation panel
- Click on the Plugins tab
- Under Activity modules > External tool click on the Manage tools link

-
Click on the configure a tool manually link

- Complete the following fields in the External tool configuration form under Tool Settings:
- Tool Name: Enter name as given above for current provider, e.g. Lumen Platform
- Tool URL: Enter provider domain as given above for current provider, e.g. "courses.lumenlearning.com"
- Consumer key: Enter the Consumer Key provided to you by Lumen
- Shared secret: Enter the Secret provided to you by Lumen
- Tool configuration usage: Select Do not show; use only when a matching tool URL is entered
- Default launch container: Select Embed

- Complete the following fields under Privacy:
- Share launcher's name with tool: Select Always
- Share launcher's email with tool: Select Always
- Accept grades from the tool: Select Always
- Check Force SSL
- Click on Save Changes

- Repeat steps 1-7 for each of the remaining Lumen provider domains (goldilocks.lumenlearning.com & ohm.lumenlearning.com), replacing tool name and URL in the first two fields of Step 4 (as per above). The keys and secrets are the same for each provider.
Testing the LTI Integration to Lumen
Your connection to Lumen should now be set up. Next, we ask that you perform a short guided test to check that the integration was completed successfully, and confirm that Lumen courses will work correctly within your institution’s LMS.
To perform this test so you’ll need to import a test cartridge into your LMS. If you haven’t already downloaded this cartridge, as recommended at the start of this document, please download it from here now.
Import the Test Cartridge
Once the download is complete return to Moodle:
- In Moodle click on Site administration in your navigation panel
- Click on the Courses tab
- Under Courses click on the Restore course link

- Click on the Choose a file button next to Files
- In the file picker under Attachment, click Choose File
- Select the Lumen Moodle Integration Test Cartridge mbz file that you just downloaded
- Click Upload this file
- The name of the file you selected will now be shown. Click on the Restore button underneath

- A confirmation screen with the Backup and Course details will now be shown. Scroll to the bottom and click Continue.
- Under Restore as a new course ensure that Restore as a new course is selected, select an appropriate category for the test course, and then click on Continue
 Note: If you have an existing course that you would prefer to use for testing you may wish to restore into an existing course instead. Please ensure in this case that you select Delete the contents of the existing course when doing the restore.On the Restore settings screen leave the default selections and click Next.
 - On the Restore settings screen leave the default selections and click Next.
- On the Course settings screen ensure all sections are selected (these should be selected by default)
- Click Next
Note: Importing the test cartridge will copy the content of that cartridge into the test course. This import is content only and does not include any student/faculty enrollments or other data such as grades.
- On the Review screen scroll to the bottom and click Perform Restore

- You should now see a message stating that the course was restored successfully. Click Continue to navigate to the course that was just created.
Testing the Cartridge
To test the integration simply open the first item in the test course and follow the instructions guiding you through our short test process.
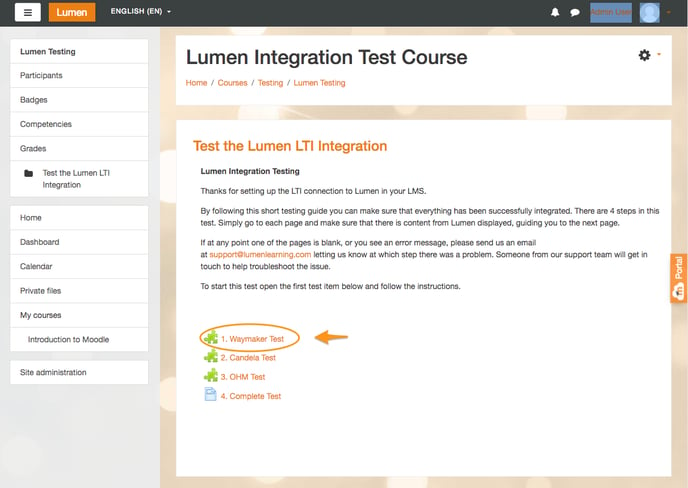
If you experienced any issues while importing the cartridge, or if this first page is either blank or is displaying error messages please send us an email at support@lumenlearning.com with a screenshot so that we can troubleshoot the problem.
Thanks for helping us to get Lumen Learning set up at your institute!