In order to create a new course, you'll need to click on the "Add New Course" button from the home page of your instructor account.

On the new course page, you will need to enter your desired course name and the enrollment key. Your enrollment key will be used if you have students enroll themselves in your course (rather than you enrolling them). Make note of the course ID (generated after you submit the course settings) and Enrollment Key so you can pass this information along to your students.
- Note: If you are using LTI through an LMS to link to Lumen OHM, you do not need to worry about a key. Your LMS will verify each student's identity.

Course Settings and Templates
There are several course settings on this page. The most essential ones are discussed below:
When will the course be available?-
- Do you want the material available to students right now? This allows you to hide the content from students at the end of the course.
Decide whether you are are going to build a course from scratch.
- Once you hit Submit, you will be redirected to a page indicating that your course has been created. The course ID will be generated and available on this page.
- Make note of the course ID and Enrollment key to pass along to your students if you are not using LTI through your LMS. (If you don't know what LTI is, then you are probably not using it, so don't worry.)
Customize an Existing Course
Copying Content
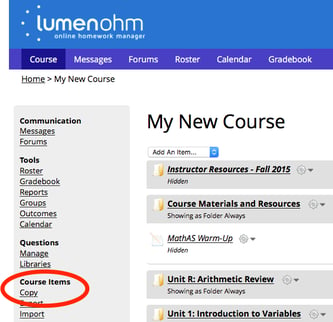
You may also want to bring in portions of content from different courses. Once you have created your course (either as a blank course or as a template course), you'll click on Enter the Course. This is your course's page.
In the left-hand menu, you'll find a section called Course Items. You can bring in items from other courses by clicking on Copy (you'll be copying items from the courses). All public courses are available to preview from this Copy Course Items page. You can only copy other courses that do not have an enrollment key set.
You will be taken to a page with the following choices from which to copy content. For each of these choices you can either copy the whole course or individual items.
- My Courses - you will be given a list of your courses to choose from.
- My Group's courses - everyone who requests an instructor account from the same institution are placed into the same group - you will see a list of the other faculty with instructor accounts at your institution. This is a great way to share template courses amongst entire departments.
- Other's Courses - here is a huge list of other instructors using Lumen OHM. Remember, you can only copy other courses that do not have an enrollment key set.
- Template Courses - you can choose from our list of template courses.

Once you have selected a course, click Select Course Items at the bottom of the page. From this page, you can then select to copy the entire course or you can select specific items.
Course Page Layout
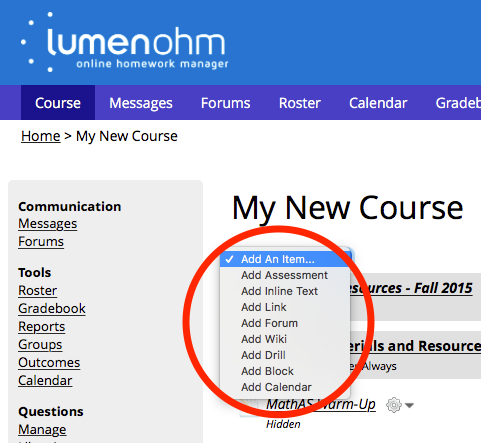
The course page consists of a list of items. There are eight types of items:
- Block: Groupings of items (Inline Text, Linked Text, Assessments)
- Inline Text Item: Text that displays on the course page
- Link: A summary displays on the course page. A link is provided that can display text, an uploaded file, or a weblink
- Forum: Basic discussion forum
- Assessment: Tests or Practice questions
- Calendar: The course calendar, if you want to embed it on your course page
- Drill: xxxxx
- Wiki: xxxxx
Blocks have a colored header. If a block is displayed collapsed, click the block name or the expand arrow to view the block's contents. If the block is displayed as a folder (has a folder icon next to it), click the block name to view the block items.
Text items are preceded with an information yellow sticky note icon, forums are preceded with a F icon, and assessments are preceded with a pencil and lined paper icon. The icons will be grey when the item is not available, and (depending upon install settings) may change color as a deadline approaches. The color is green at two weeks, yellow at one week, and red on due date.
The item order can be rearranged by using the number selector to the left of the item. Items can also be moved into or out of blocks using this selector.
Adding New Content
Adding Items
Add an item by selecting the item type from the "Add Item" pulldown. Using the "Add Item" pulldown inside a block will add the item to that block.
Blocks
For Blocks, you will asked to provide:
- Title: The title of the block
- Available after: The first date for the item to display to students
- Available until: The last date for the item to display to students
- When available: Whether you want to display the block Expanded, Collapsed, or as a folder when available
- When not available: Whether you want to hide the block from students when not available, or show collapsed or as folder (depending on available setting). Use the show collapsed/folder option if the block contains items that students still need to be able to access.
- Colors: Allows you to specify colors other than the defaults for blocks
Inline Text Items
For Inline Text items, you will asked to provide:
- Title: The title of the item
- Hide title: If you want to hide the title and icon, and just display the text
- Text: The actual text (displays on course page)
- Files: You can attach one or more files to an inline text item. For each file, provide a description of the file. A list of the descriptions, with links to the files, will display at the bottom of your text item.
- Available after: The first date for the item to display to students
- Available until: The last date for the item to display to students
Linked Text Items
For Linked Text items, you will asked to provide:
- Title: The title of the item
- Summary: A description of the link (displays on course page)
- Text: Enter one of the following:
- Type text in box provided. The text will display when link is clicked
- Enter a weblink (like http://www.google.com). The link will take students to this weblink
- Attach a file. The link will open the file. Note: Do not change the text on subsequent modifications
- Available after: The first date for the item to display to students
- Available until: The last date for the item to display to students
Forum Items
For Forum items, you will asked to provide:
- Name: The name of the forum
- Description: A description of the forum (displays on course page)
- Available after: The first date for the item to display to students
- Available until: The last date for the item to display to students
- Group linked: If you have a group assessment, you can link the forum to the groups of that assessment. If you do this, students viewing the forum will only see posts from their group members and instructors. Be aware that posts to group linked forums often won't trigger the red "New Posts" flag on the home page.
- Allow anonymous posts: Whether you want to allow students to post anonymously
- Allow students to modify posts: Whether you want students to be able to modify their posts
- Email notify: Whether you want to receive an email whenever a new post is made on the forum
- Default display: Whether you want threads to display Expanded, Collapsed, or in Condensed format by default. Users can change the display once they view the thread
- Students can reply by: Optionally set date restrictions for students replying to posts. Can be overridden in individual threads.
- Students can create new threads by: Optionally set date restrictions for students creating new threads
- Count in gradebook: Whether you want the forum to count in the gradebook for points. You will be able to assign points for individual posts made.
- Gradebook category: Category for the gradebook, if assigning points to the forum.
When you as a teacher start a new thread, you are given the option to have it be:
- A regular post
- Always display at the top of the list
- Displayed at top and locked (no replies can be made)
- Displayed at top and replies are hidden from students
You can use the middle two options to, for example, post discussion instructions. You can use the last option to post a question in class, and have students respond without seeing other students' replies.When viewing the forum thread list as an instructor, there is a "List Posts by Name" link which will list all posts in the forum, grouped by student name. New threads are colored in black, replies in green
Adding Questions to an Assessment
You can add existing questions to an assessment by clicking the "Select Library" button to choose libraries to search, then the "Search" button to list potential questions. Leave the "Search" entry blank to list all questions in the libraries selected. The checkboxes can be used to search in all libraries (not just the selected ones), list only questions you own, or exclude questions you've already added to your assessment.
From this list you can:
- Use the checkboxes to select questions, then click the "Add Selected (using defaults)" button to add the questions. Adding this way will use the assessment default settings for points, attempts allowed, and penalty per attempt. You can change these later by clicking the "Change Settings" link.
- Use the checkboxes to select questions, then click the "Add" button to add the questions. Adding this way will allow you to override the default settings for points, attempts allowed, and penalty per attempt if you wish, and add a question multiple times.
- Click the "Add" link. This will allow you to change the default question settings
- Click "Use as template for New Question" link. This will create a new question based upon the existing question. This allows you to avoid rewriting a question from scratch if a similar question exists
- Click "Preview" to preview the question
Alternatively, you can click the "Select from Assessments" button to choose questions from existing assessments. In this mode, select the assessments you wish to pull questions from and click "Use these assessments". Then select the questions you wish to use.
Once added to the assessment you can:
- Reorder Questions: When "Rearrange Questions" is selected, using the number selectors next to each question will allow you to rearrange the order of the questions. This is only useful if you are not shuffling the question order
- Group Questions: When "Group Questions" is selected, using the number selectors next to each question will allow you to group questions. When questions are grouped, the testing engine will randomly select one question from the group to display to the student
- Change Settings: Override the default settings for points, attempts allowed, and penalty per attempt, if desired
- Edit Source: Change the question code or wording
- Remove from assessment: Remove the question from the assessment. This does not delete the question from the Question Set. You can also use the checkboxes and the "With selected, Remove" button to remove multiple questions at once.
If students have taken the assessment, you will not be allowed to make as many changes to the assessment, as it will mess up existing student attempts. If you need to change the assessment a lot, you can clear all student attempts. Otherwise you can change individual question settings (be careful!) or edit the question if it's yours. If there is a problem with the question, you modify it, and want to give students another chance on that question, you can clear all attempts on a single question by clicking the "Clear Attempts" link.